How to create and sign a W-9 form online
Need to know how to fill out a W-9 form online?
You’ll be pleased to know it is quite easy to do!
The W-9 form is available as a downloadable and fillable PDF form from the official website of the Internal Revenue Service (IRS).
PandaDoc software can help you to fill out a W9 online quickly and with ease.
These forms are a vital part of working on a contract basis.
Understanding how to fill out a W-9 form online will reduce the hassle of onboarding and save you and your new employer a tremendous amount of time.
For your reference, here is a sample of a blank W-9 form.
After reading this article, you will know exactly how to fill out a W-9 online. We will cover the following points:
- How to fill out a W-9
- How to sign a W-9 form online
- How to submit your finished W-9 form
So, let’s delve into the details.
Now, let’s get started on how to fill out a W-9 online!
How to fill out a W-9
1. Download a blank W-9 and save it to your device
Most employers will provide you with a blank W-9 as a part of standard onboarding.
- Visit the IRS website to download a free W-9 Form from IRS website if you haven’t received your form.
2. Upload the blank W-9 to your PandaDoc dashboard
- You will need to upload a blank W-9 document to your PandaDoc account to begin filling it out online.
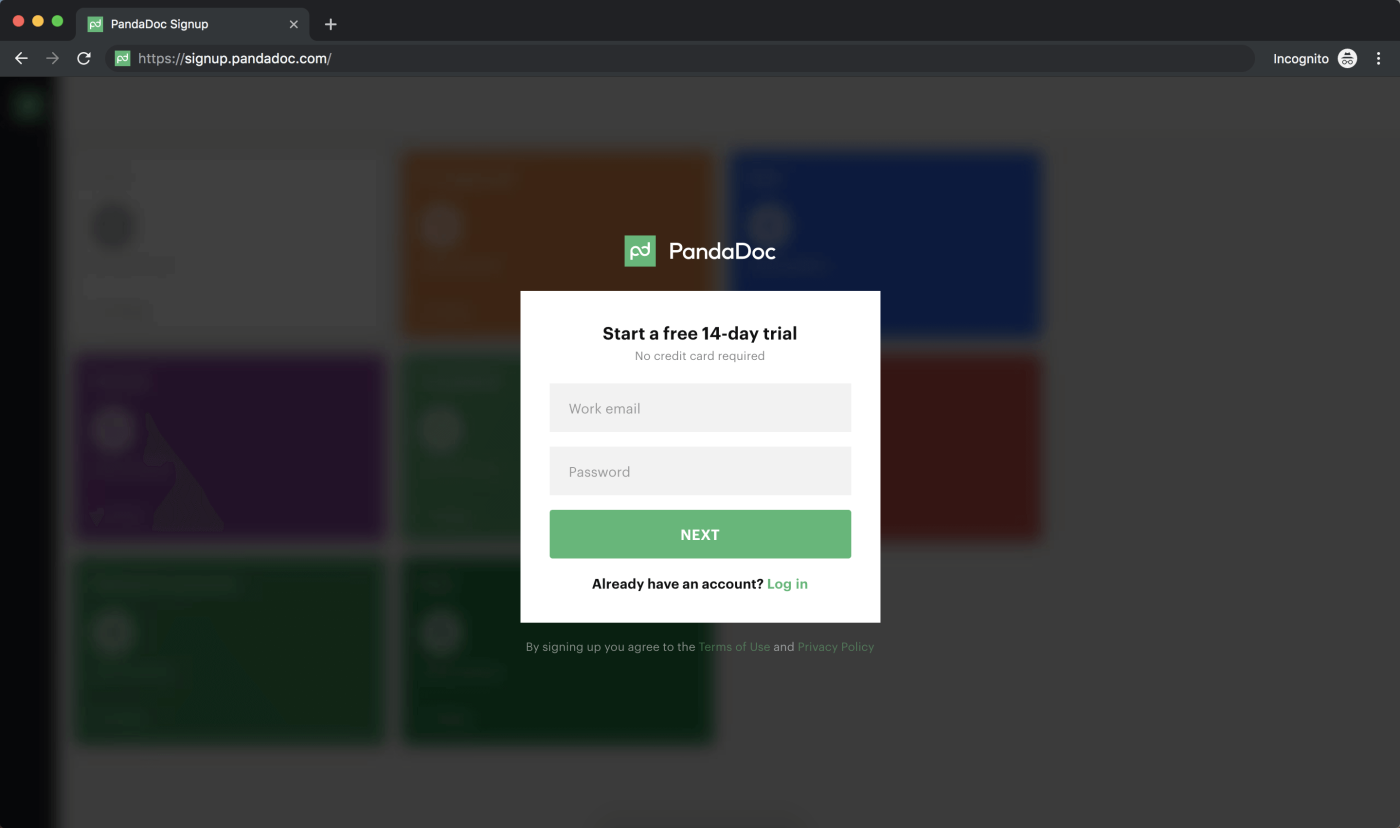
- If you don’t already have one, create a PandaDoc account to upload your W-9 and get started.
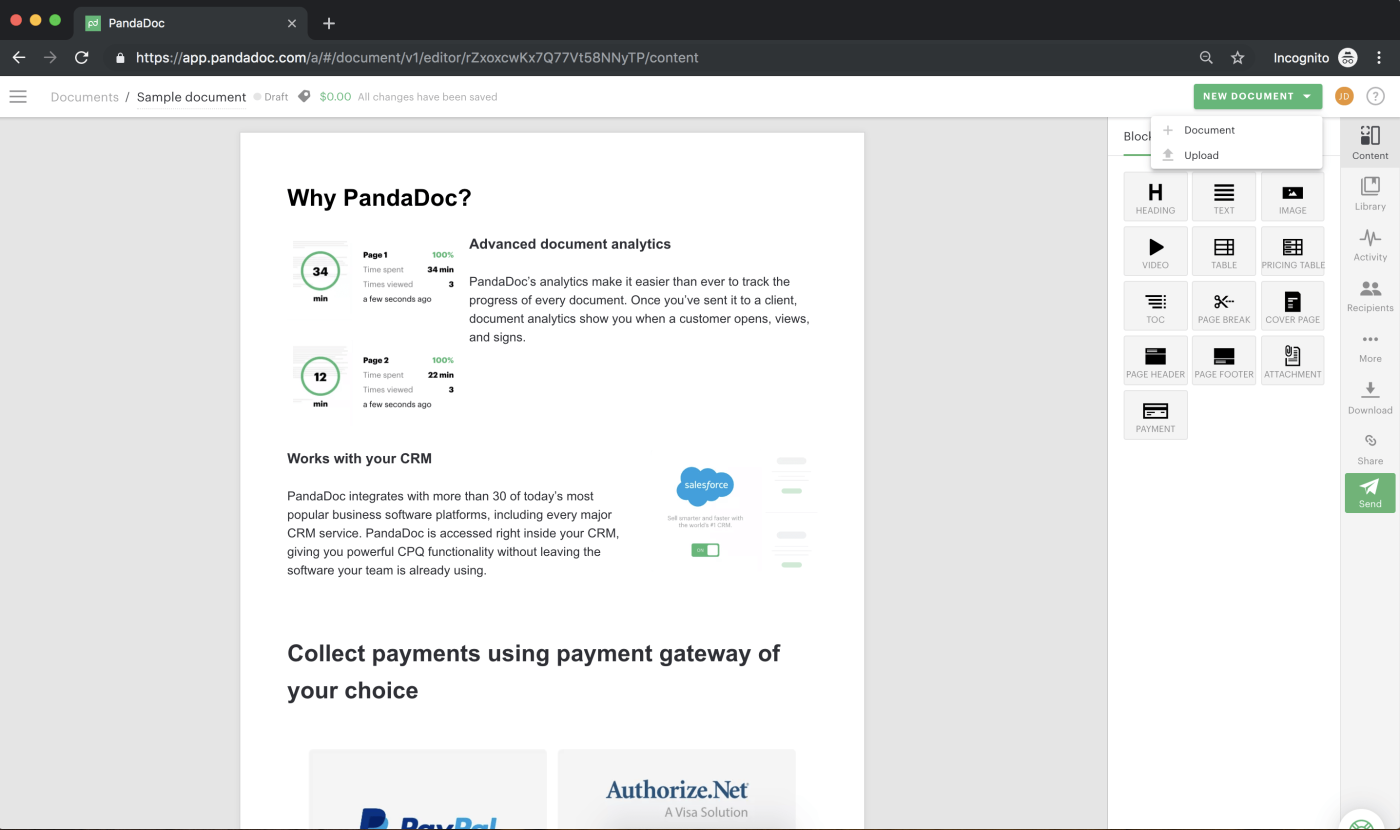
- Once you’ve signed into your PandaDoc account, click the green New Document button in the upper right-hand corner of your browser.
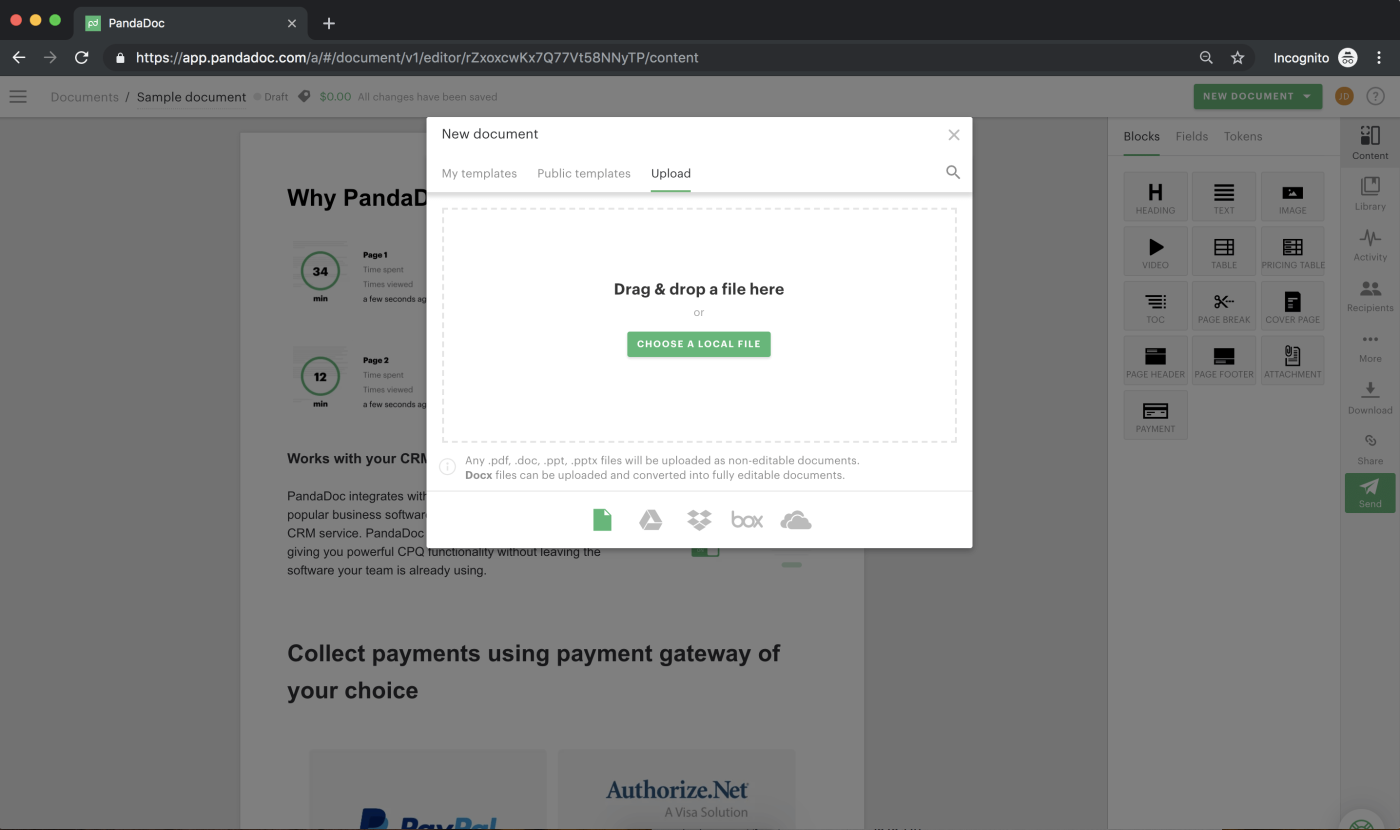
- Select Upload to save your blank W-9 to your account.
- You may drop your blank W-9 form into the designated space of your browser window, or locate the file on your computer and upload your form.
PandaDoc allows you to connect your Google Drive, Dropbox, Box, or OneDrive accounts to upload your blank W-9 document.
You will be prompted from your PandaDoc dashboard to indicate which files to transfer from one of these document sources.
Follow the prompts to connect your preferred document source and upload your W-9 document.
Note: PandaDoc will only access the documents you choose to upload to your PandaDoc account.
3. Use the Fields pane on the right side of the browser window to fill out your W-9
- Quickly fill out the W-9 form with the tools provided in the Fields pane to the right of your browser window.
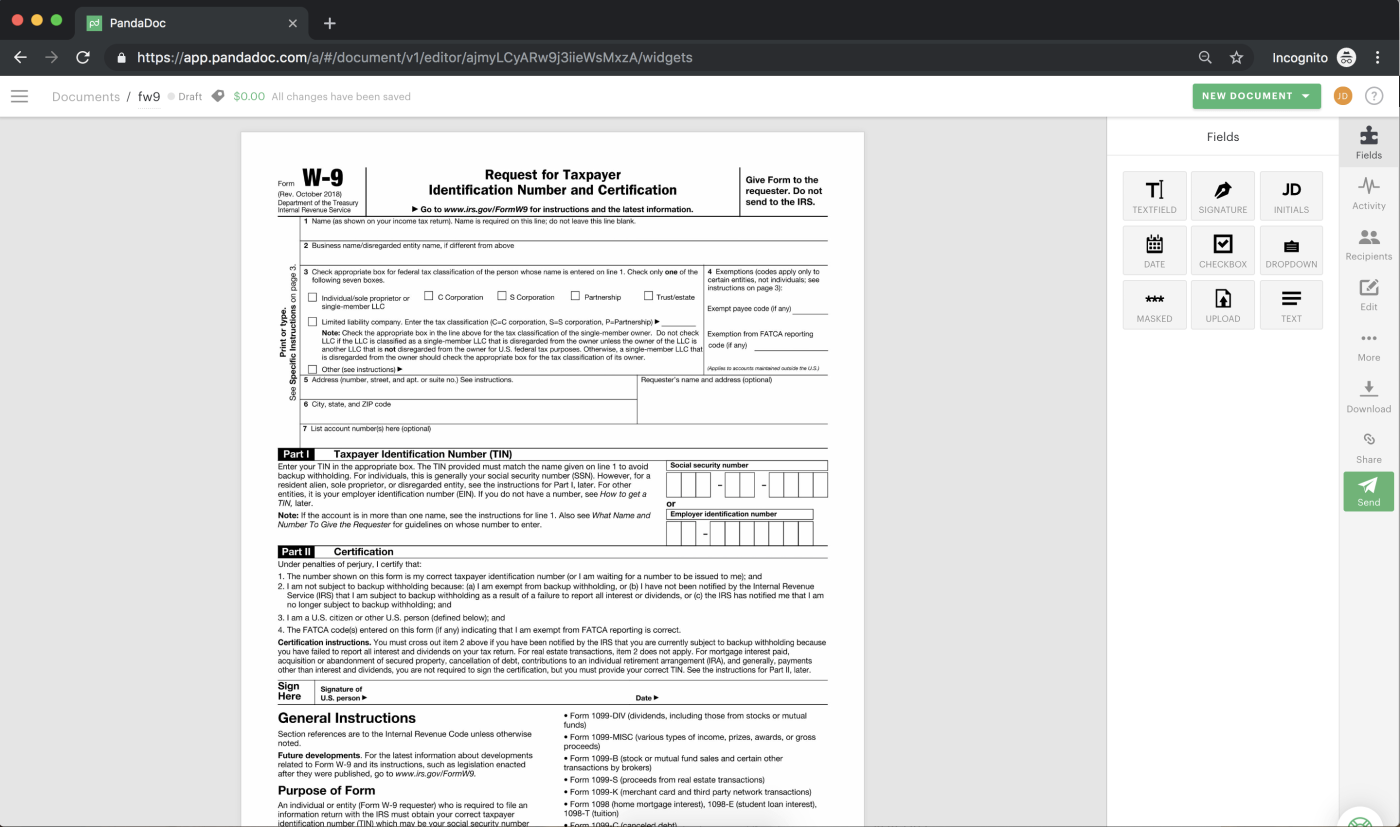
The tools found here are designed and organized to allow you to quickly input the required personal information for any standard forms like the W-9.
These fillable fields include formatting options text and electronic signature fields as well as checkboxes, etc.
As the W-9 requires information to be provided in different formats as you fill out the document, PandaDoc is designed to accommodate each detail.
Simply click and drag the selected where need it for the field you are on.
No need to worry if you drop a tool incorrectly on the form, you can move anything you add to a document by dragging it to the desired location.
Text fields: Enter information such as your name, your mailing address, your social security number, and any business names which you intend to use for tax purposes, etc.
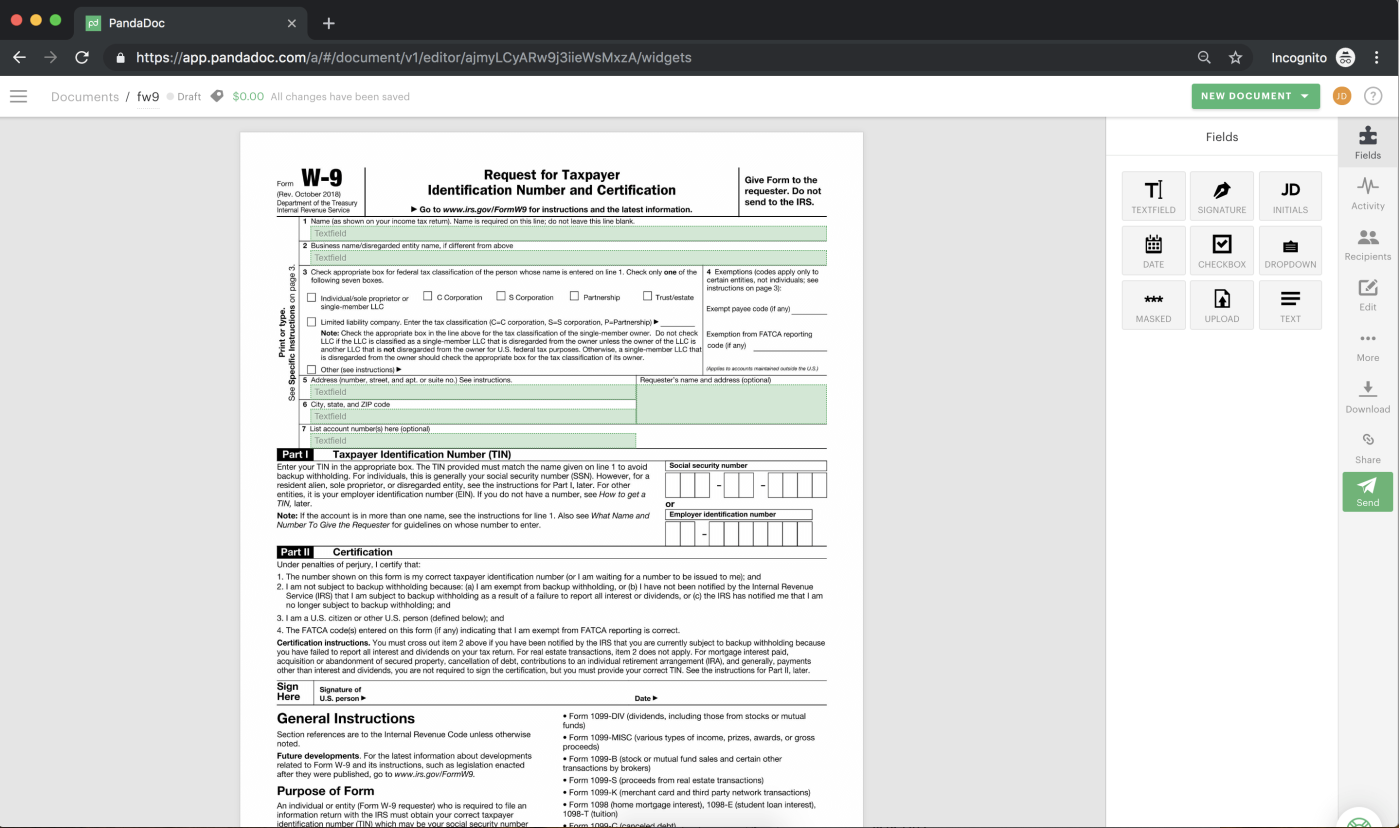
Note: You can drag the white circles in the corner of the text box to adjust the size of the text field.
Check marks: Drag check marks onto the W-9 where applicable. Use this tool to select what kind of federal tax classification you use for your contract work (individual/sole-proprietorship, C corporation, limited liability corporation, etc.).
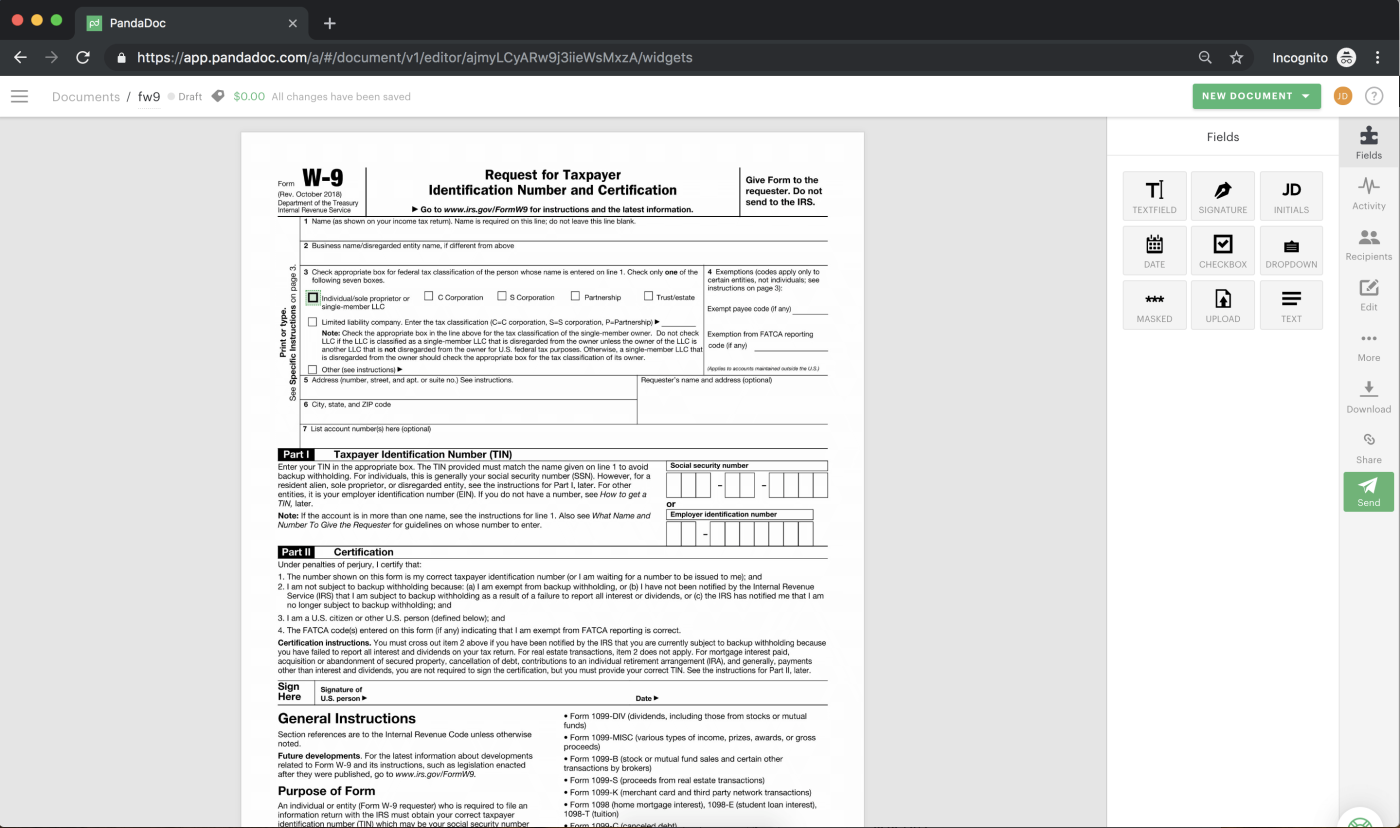
These tools show you how to fill out a W-9 quickly and easily.
4. How to sign your W-9 form online
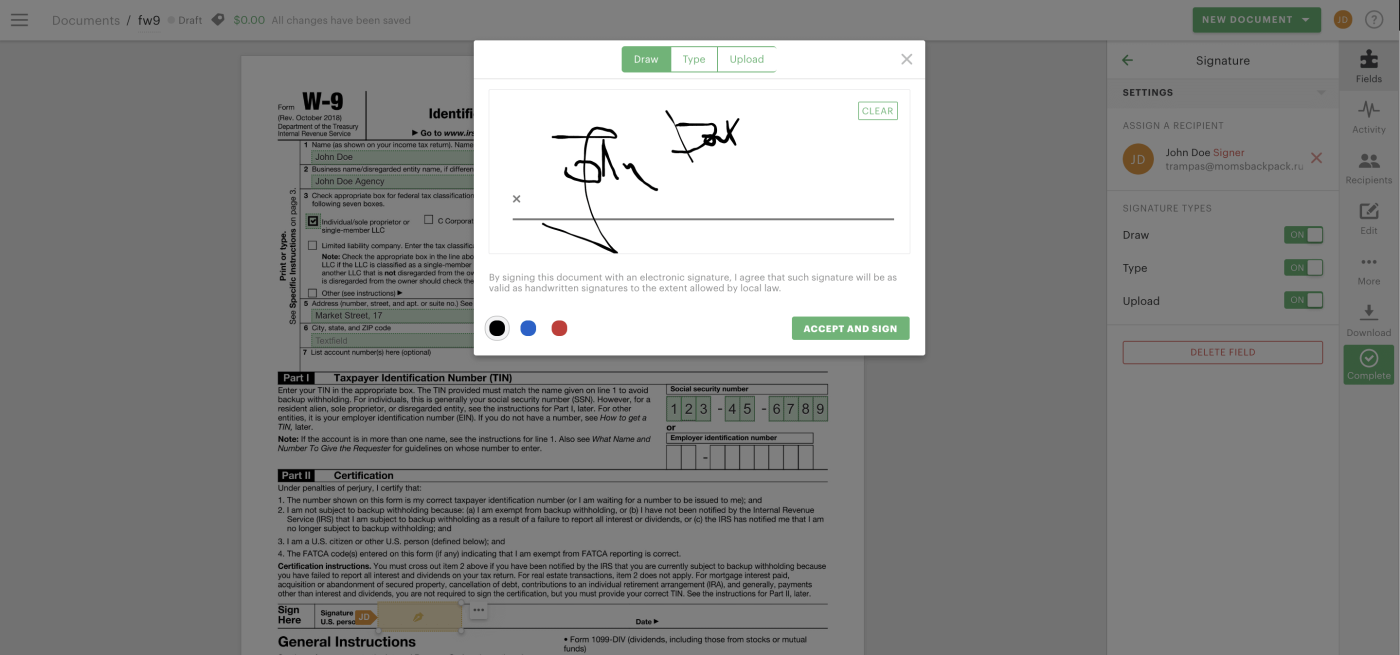
The final step in filling out a W-9 online is signing the W-9 form. PandaDoc’s signature tool allows you to create a legally binding signature that you can type, upload, or draw.
- Upload your W-9 signature from an image file on your device or sign your W-9 with a finger using your touch screen or mouse.
- Drag the Signature tool onto your document and double-click in the box it creates to select the signature type you prefer.
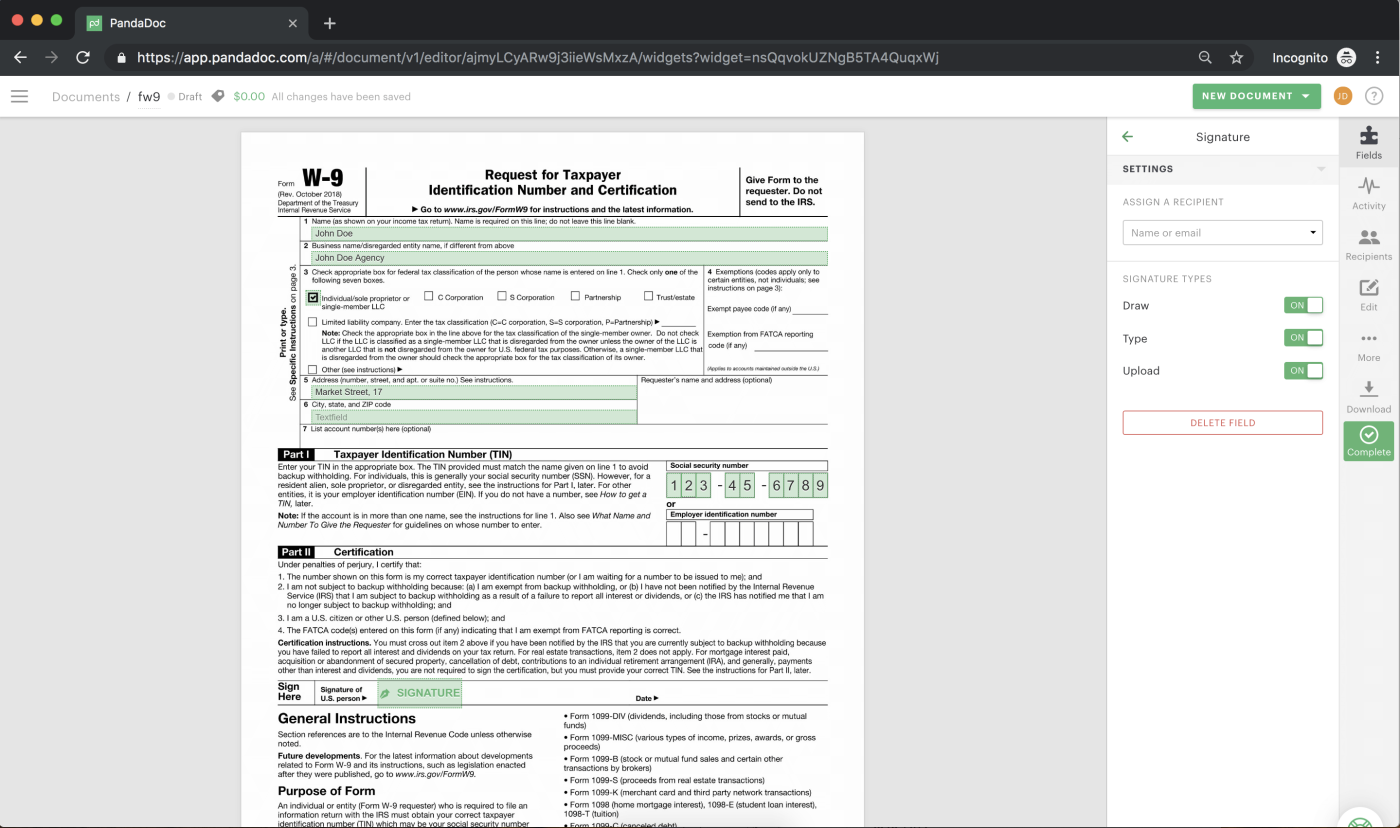
- When you are satisfied with your signature as it appears on your screen, click the green Accept and sign button.
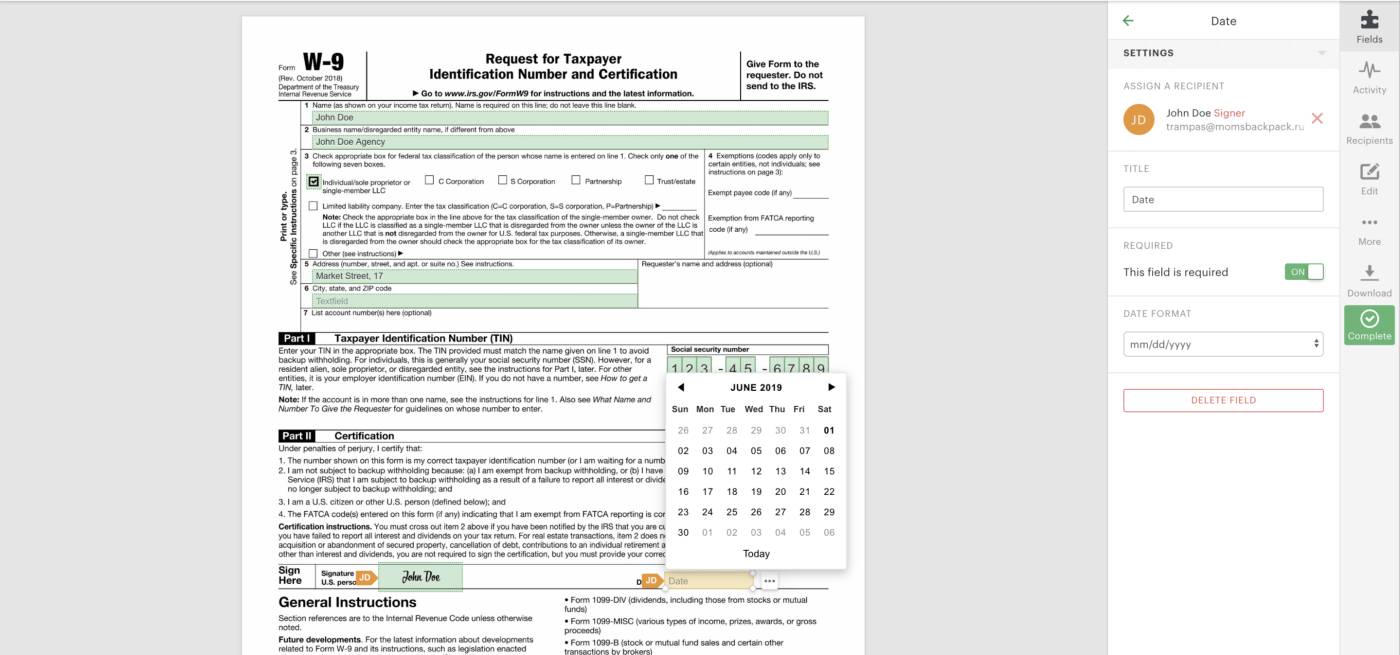
- To populate the date field next to the signature on your W-9, drag the Date tool onto your document. Double-click within the field to select the date of signature from the calendar.
The pop-up calendar will always open on the current month.
Prior to submitting your W-9 to the Internal Revenue Service (IRS), it needs your signature.
The signing taxpayer is subject to civil and/or criminal penalties for willful non-compliance. PandaDoc makes signing your W-9 online simple.
Can you sign a W-9 electronically?
Yes, the IRS accepts electronic signatures for W9 forms. If you choose to use an electronic signature, it is vital to use a secure electronic signature service that complies with the IRS’s requirements.
The service must include a secure method of signing documents, as well as a way to validate the identity of the signer.
Lastly, the service must provide an audit trail that can be used to prove the signature was valid.
PandaDoc can provide all of these elements when signing your W-9 form electronically.
This is a convenient way to sign and submit your W9, and it can help you avoid delays in getting your tax refund or other payments from the IRS.
Remember that not all electronic signature services are the same.
Make sure you choose a reputable service, such as PandaDoc, that will ensure your signature is legally binding.
5. Complete and submit your finished W-9
You still need to submit a completed and signed W-9 to your new employer in order to be paid.
- Click the green Complete button on the right side of your browser window.
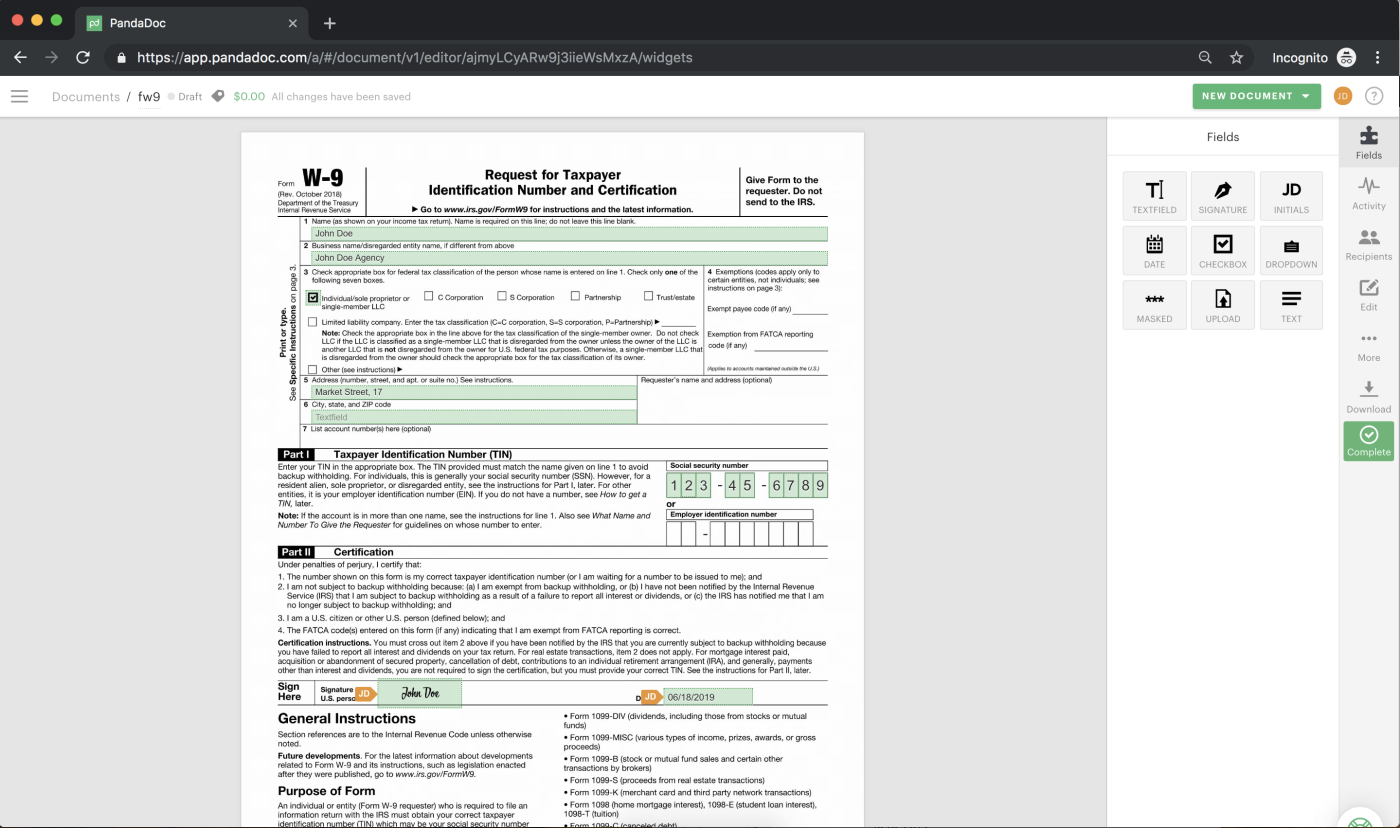
PandaDoc will verify that you have finished the W-9, then let you choose where to download the completed form W-9 directly to your computer so that you can send it to your new employer.
Alternatively, you can send your completed and signed form W-9 to your employer directly through PandaDoc.
- On the right of your browser window, locate the Recipients button which for adding entities to which you’ll send your signed W-9.
- Add a recipient by clicking in the text field at the top of the Recipients pane and then clicking Add new contact.
- You will be prompted to enter their name and email address.
- Click the green Add button to add the record and automatically submit the form to your recipient.
- Anyone added to the recipient’s list of your document automatically receives the W-9 form in his or her email; there is no further action needed.
You’re finished! Ready to get your W-9 signed so you can be paid?
To start getting paid as a contract worker, create a PandaDoc account, then complete and sign your W-9 tax form online.
Employing contractors? Sign in to your PandaDoc account to have online W-9 forms prepared for your independent contractors. Let’s get to work!
PandaDoc gets your important business documents signed faster.
End-to-end integration with 3rd-party apps and detailed document analytics means convenient and accurately documented information accessible whenever you need it.
Why not sign up for a free 14-day trial now?
